Don't mistake this for arrogance on my part, but I've noticed some common problems in some of the avatars being uploaded and I thought a simple guide might help you out. I'm by no means a graphics expert. This is a guide for Photoshop users but I think people who use GIMP or whatever might also get something out of it. It's got some general "why would you do that!?" points dispersed throughout.
Step 1:
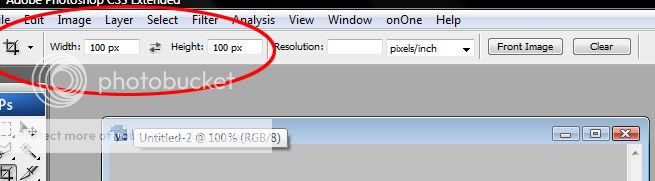
It's 100x100, doofus!
Seems obvious, I know. If you've got a ready-made avatar that's too big, resize it. We'll go over that later though.

Step 2:
Makin' borders
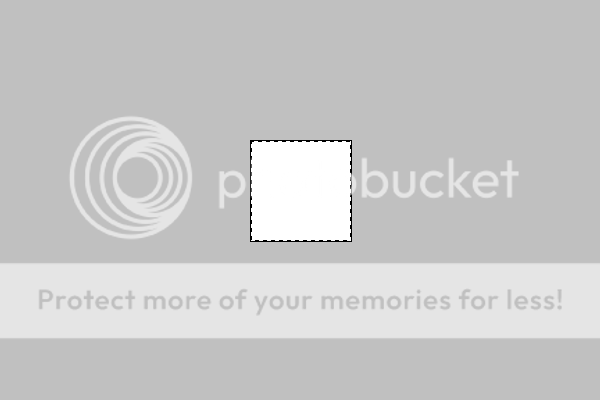
There's too many pictures I'd have to take with this one, so just follow my explicit instructions. Create a new layer (TO MAKE SURE YOUR BORDER ISN'T ATTACHED TO THE BACKGROUND). Press Ctrl + A on your new 100x100 cube, highlighting it and getting something like this:
Then, and here's the tricky part, go to Edit --> Stroke.
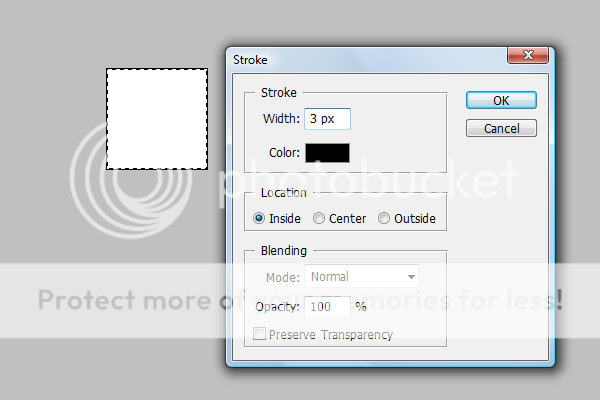
This is how you add border. Generally, you want your border to look substantial and so you want to set it to at least 2 pixels (that's the px part) thick. Unfortunately for this guide, you have a ton of options. What I do is to copy the look of the "traditional" WZ avatars. How I do it is as follows:
1) Edit --> Stroke --> Black, 3 pixels
2) Edit --> Stroke --> White, 2 pixels
3) Edit --> Stroke --> Black, 1 pixel
You can find guides for fancier borders elsewhere. Just use Google search.
Step 3:
Resizing images
Look at this Randy Savage picture - much too big to fit in 100x100 frame, right? Wrong.

Because I'm going to show you how to resize it, and resize it the right way. You might have to press Ctrl + T to bring the "construction lines" up.
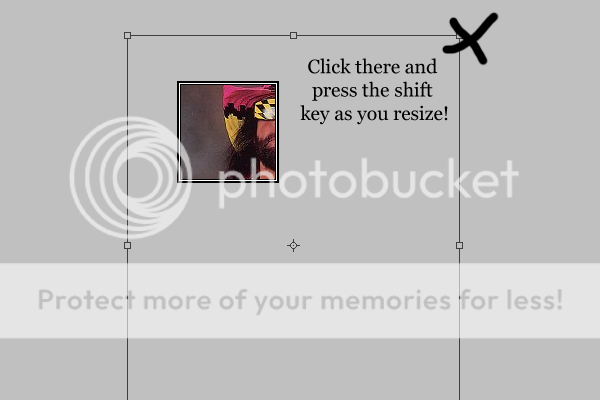
That's right - press (as in, hold it) the shift key on the corner and drag it in to resize it. This stops the dimensions going askew - like I've seen with many of your avatars - and so we end up with a nicely proportioned Randy Savage at the end. Check it:
Obviously, make sure your image goes underneath your border.
Step 4: Finishing touches
In my mind, that's a perfectly serviceable Randy Savage avatar. No need to fuck about with it. But for you, WrestleZone, I will. I'll tell you you a couple of my favourite tricks.
Trick 1: Increasing contrast
I'm sure there's an easier way to do this. Unfortunately, I've never bothered to investigate. Just put up a black and white Gradient Map over it, then click overlay. Did it not really work? Try fiddling with the transparency to find a good balance. You could end up with something a little more dramatic:
Trick 2: Adding text
Not strictly a trick. There are, however, two or three things to remember:
1) It doesn't have to have text. It could kill it. You only really need to have text on avatars with less well-known stuff on it. Like, for example, Brian Danielson.
2) Choose your font carefully. It might be a perfectly nice font, but just not really look all that good on an avatar. I've started using Lucidia Sans Unicode, which you should have already in your Photoshop.
3) Make sure your font contrasts to the rest of your avatar - it shouldn't just sort of blend in; it has to stick out.

There are much more advanced techniques and effects out there. All you need to do is find the right tutorial. Google is your friend. However, this is your very basic guide to the dos, don'ts and how-tos of avatar crafting. There's no better way to learn than to try it yourself.
Step 1:
It's 100x100, doofus!
Seems obvious, I know. If you've got a ready-made avatar that's too big, resize it. We'll go over that later though.
Step 2:
Makin' borders
There's too many pictures I'd have to take with this one, so just follow my explicit instructions. Create a new layer (TO MAKE SURE YOUR BORDER ISN'T ATTACHED TO THE BACKGROUND). Press Ctrl + A on your new 100x100 cube, highlighting it and getting something like this:
Then, and here's the tricky part, go to Edit --> Stroke.
This is how you add border. Generally, you want your border to look substantial and so you want to set it to at least 2 pixels (that's the px part) thick. Unfortunately for this guide, you have a ton of options. What I do is to copy the look of the "traditional" WZ avatars. How I do it is as follows:
1) Edit --> Stroke --> Black, 3 pixels
2) Edit --> Stroke --> White, 2 pixels
3) Edit --> Stroke --> Black, 1 pixel
You can find guides for fancier borders elsewhere. Just use Google search.
Step 3:
Resizing images
Look at this Randy Savage picture - much too big to fit in 100x100 frame, right? Wrong.
Because I'm going to show you how to resize it, and resize it the right way. You might have to press Ctrl + T to bring the "construction lines" up.
That's right - press (as in, hold it) the shift key on the corner and drag it in to resize it. This stops the dimensions going askew - like I've seen with many of your avatars - and so we end up with a nicely proportioned Randy Savage at the end. Check it:
Obviously, make sure your image goes underneath your border.
Step 4: Finishing touches
In my mind, that's a perfectly serviceable Randy Savage avatar. No need to fuck about with it. But for you, WrestleZone, I will. I'll tell you you a couple of my favourite tricks.
Trick 1: Increasing contrast
I'm sure there's an easier way to do this. Unfortunately, I've never bothered to investigate. Just put up a black and white Gradient Map over it, then click overlay. Did it not really work? Try fiddling with the transparency to find a good balance. You could end up with something a little more dramatic:
Trick 2: Adding text
Not strictly a trick. There are, however, two or three things to remember:
1) It doesn't have to have text. It could kill it. You only really need to have text on avatars with less well-known stuff on it. Like, for example, Brian Danielson.
2) Choose your font carefully. It might be a perfectly nice font, but just not really look all that good on an avatar. I've started using Lucidia Sans Unicode, which you should have already in your Photoshop.
3) Make sure your font contrasts to the rest of your avatar - it shouldn't just sort of blend in; it has to stick out.
There are much more advanced techniques and effects out there. All you need to do is find the right tutorial. Google is your friend. However, this is your very basic guide to the dos, don'ts and how-tos of avatar crafting. There's no better way to learn than to try it yourself.