
This thread is to teach you how to build a file server. With a file server, you can back up any and all files you want to an old machine, making use of an old computer that serves no other purpose. You can then access your files from any computer in your home, even stream music or videos from your file server. THIS TUTORIAL MAY LOOK LONG, BUT ONLY BECAUSE IT IS VERY DETAILED. IT IS MUCH FASTER TO WORK THROUGH THAN IT LOOKS.
First, credit where credit is due. The majority of the heavy lifting was done by the following how-to on howtoforge.com.
http://www.howtoforge.com/opensuse-12.1-samba-standalone-server-with-tdbsam-backend
This tutorial is to help you re-purpose an old computer that is no longer being used. In this process, you will completely wipe the contents of your hard drive, so if you have any files you want to back up, do so before you begin. Aside from downloading and installing the operating system, this process is not too lengthy.
Please note: Your computer needs to have at least 512 MB of RAM. Any less, you might be able to do this, but I cannot guarantee you this tutorial will work. Your computer also needs at least a DVD-Rom (you might be able to get by with a CD-Rom, but I have not tested this). Also note, the bigger your hard drive, the more files you will be able to store. Finally, you need to have your file server connected to your router with a network cable.
Start-up Instructions:
1. Before you begin, please download the latest DVD version of OpenSUSE. Make sure you either get the 32 or 64 bit, depending upon what your computer is (if it's an older computer, it's likely 32 bit). If you know how to use BitTorrent, it will be a much faster download.
2. Download and install ImgBurn.
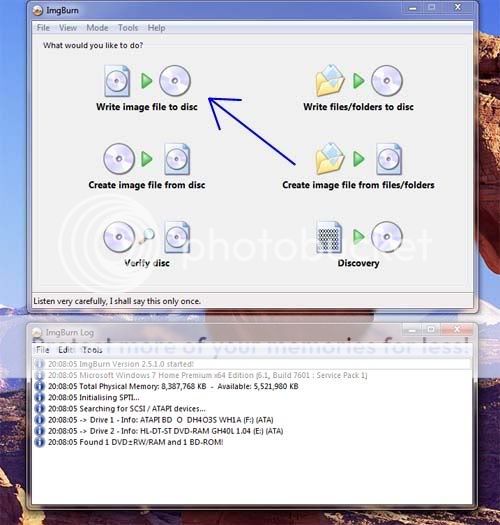
3. Run ImgBurn, insert a DVD into your DVD Writer, select "Write Image file to disc".
4. Under "Source", locate and select the OpenSUSE .iso file you downloaded. Burn the .iso to your blank DVD.
5. Once the disc is finished burning, you should now have a bootable DVD of a Linux operating system. Remove the disc, and take it to the computer you are setting up as a file server.
Building the Operating System:
The next thing we need to do is install OpenSUSE on the old computer.
1. Power on your machine, and immediately enter the system BIOS. Different machines do this in different ways, but it's usually by pressing the "Del" key or "F2" or "F12" immediately after powering on the computer. Each computer is different and each machine will usually tell you how to enter the system setup or BIOS.
2. Once in the BIOS, search for something which will let you change your Boot Order, or Boot Priority. You want to change your BIOS so your DVD-Rom is the first device to boot (before your hard drive).
3. Once you've changed your BIOS boot-up order, insert your OpenSUSE DVD, save your BIOS changes and restart the computer.
4. The OpenSUSE disc should boot now. When given the prompt, you want to select "Installation". Wait as the installer software loads.
5. Once the installer loads, work your way through the prompts (keeping the defaults). Accept the License Agreement, choose "New Installation", select your Time Zone.
6. Once you get to the screen that says "Desktop Selection", select "Other". Check the "LXDE Desktop" and click Next.
7. On the "Suggested Partitioning" screen, select "Create Partition Setup". On the next screen, select option 1 (which should be your hard drive, do NOT select Custom Partitioning) and hit Next. When given the option, you want to "Use entire disk". This will wipe your existing Windows installation. Once you've finished with partitioning, select Next.
8. Now you create the system's user. Put anything you want in these fields, but under "Username" I will be using the name "user". If you choose something different, you will have to substitute whatever you put in the Username field whenever I say "user". For simplicity's sake, I recommend you choose "user" as well. Remember your password, and keep all the default options (for the sake of simplicity). If you get a warning from YaST2 about your password, just ignore it, it's not important for this tutorial. After you have filled in the fields, select Next.
9. Now we come to the "Installation Settings" screen. We're going to make one change. Click on "Software".

10. On the left side, search for the "Server Functions" heading. Under "Server Functions", click in the box next to "File Server". There should now be a checkmark next to it. Click the "OK" button.
11. Click Install. Your Linux operating system should now be installing.
Configuring the File Server Software (SAMBA):
After you have installed OpenSUSE, it will automatically restart and then boot into the operating system. You should be at a desktop which looks similar to a Windows desktop. Now, it's possible to proceed in a couple of different ways, but we will use the command line terminal for reasons I will mention later.
1. We need to open XTerm. We can do this in one of two ways. The first way is to click the green lizard looking button in the bottom left hand corner (like a Windows start menu), hover your mouse over "System Tools" and select "XTerm". The other way is to press Alt and F2 at the same time on your keyboard, and in the "Run" box which pops up, type "xterm" and press OK.
2. We should now have a terminal window open. From here we are going to be issuing commands. Please note commands need to be typed exactly as posted here, as Linux is case sensitive, unlike Windows. I will try to put everything you should type into the terminal in code, like this:
3. First, we need to access the "root" account. The "root" account is like the "Administrator" account in Windows, in that it is the all powerful ruler of the system. The only time you should work as root is when you know exactly what you're doing. Type:
And then input the password you used when you installed the operating system.
4. Next we need to do some editing to the SAMBA file server. Type:
and press Enter.
5. The configuration for SAMBA should now open in the terminal. We are using the program "vi" to edit the configuration file. Vi can be a complicated program for beginners, so please follow the directions closely.
6. Move your cursor to one line below the [global] header, in front of the "workgroup = WORKGROUP". Now you need to press the "i" button on your keyboard, which will put vi into INSERT mode. You must be in INSERT mode to type in the configuration file.
7. After you are in INSERT mode (as noted at the bottom of the file), create a blank line by pressing the "Enter" button. On that blank line, type (there will be a space in between each word and symbol):
8. After you have typed that in, make sure you have a line in the [global] section that says, "passdb backend = tdbsam". If not, add that as well (should not be necessary).
9. Press the "Esc" key on your keyboard to exit INSERT mode and enter the COMMAND mode of vi. After pressing escape, type (it doesn't matter where your cursor is):
If for some reason you messed up your configuration file, and you wish to start over, get into COMMAND mode and instead of ":wq", just type ":q!". This will exit the file without saving it, and you can try again.
10. Now we need to get the SAMBA service started. Type:
and press Enter. The type:
and press Enter. We now have a working SAMBA server. But we aren't done yet.
Adding SAMBA Shares:
In order to properly be able to access files, we have to set up folders (called directories in Linux) for people to be able to access. In this section, we will create the directories to be shared for storing our files and edit the configuration of SAMBA to accept users accessing these files.
1. You should still be the "root" user, but if you're not, open a terminal and access the root user account by typing "su".
2. Type the following commands, pressing "Enter" after each line. These commands are case sensitive, so capital letters MUST be typed in capitals and lower cased letters MUST be typed in lower case.
Without getting into the specifics, what we did was create a directory called "everyone" and made it so every user can save their files to it.
3. Now we need to edit the SAMBA configuration file again. Type:
4. Scroll to the bottom of the file, press "i" to enter INSERT mode, move the cursor to a blank line at the very end of the file (you might have to press Enter after the last character) and type the following. Again, make sure it's typed exactly, and there is a space between words and equal sign. You can use the "Tab" key on your keyboard to indent. Type:
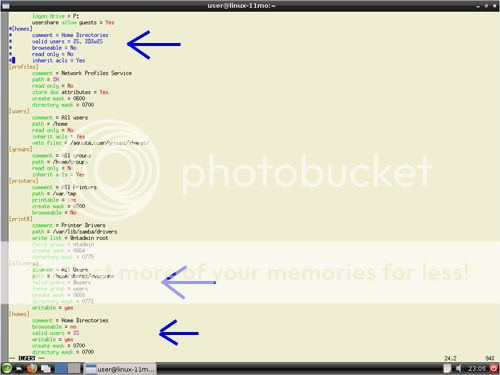
5. Before we leave the configuration file, we have one last thing to do. If you scroll up, you will see another header [homes], similar to the one we just created. We do not want to delete it, we just want to make sure it isn't used. We do this by placing a # sign in front of each line. So it should look like this (image includes the configuration settings we added).
6. Exit INSERT mode and get back into COMMAND mode by pressing the "Esc" button. Then type ":wq" to save and exit the file. Then type:
Adding Users:
So far, what we have done is set up the file server services, created a directory for everyone to access and configured SAMBA so each user can have their own personal storage space, in addition to the directory everyone is sharing. Now it's time to add users to the system. I'll be creating a new user called "slyfox" (notice it's all in lower case) but you can name your users anything you want (but lower case names is strongly encouraged).
1. Type:
This adds user "slyfox", creates a directory just for slyfox and puts slyfox into a group called "users". Or if that is too complicated, just stick with the fact it added a user named "slyfox".
2. Type:
You will be prompted to create a password for user "slyfox". Remember your password.
3. Type:
This adds the user to SAMBA. It will prompt you for another password, I recommend using the same password you used on step 2.
4. Repeat steps 1-3 as many times as necessary.
Important Miscellaneous Steps:
We have now setup our SAMBA file server and created the users who will be accessing it. The last thing we need to do is figure out HOW they will access it. We will do this by setting the IP address and disabling our firewall. We will do this in OpenSUSE's very powerful administrative program called YaST. You CAN access YaST through the command line, but we'll do it the much more visually pleasing way. However, being able to access YaST through the command line will be beneficial later.
1. Open Xterm (if it's not already open). You do not have to be the "root" account for these steps.
2. Type:
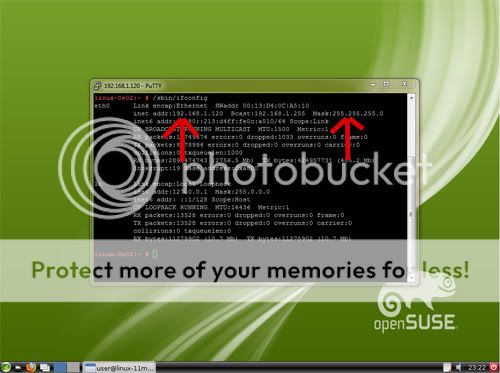
and press Enter. You should now see information for your system. Look in the "eth0" area (not lo) and find "inet addr" and write down your IP address. Find the "Mask" and write down your Subnet Mask (normally 255.255.255.0). Use the following image to help.
3. Type:
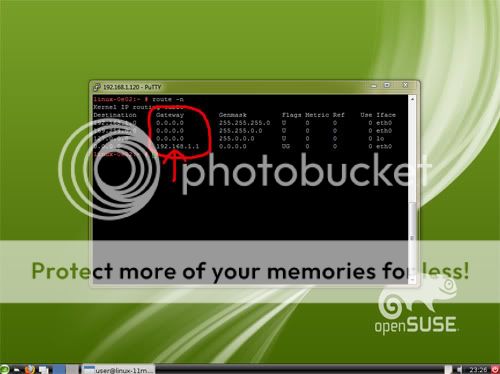
Find the "Gateway" heading and write down the number under the "Gateway" heading". Use the following image to help.
4. Now that we have our network information, let's get to YaST. Click the green lizard looking button in the bottom left hand corner (like a Windows start menu), hover your mouse over "System", then hover over "Administration" and select "YaST".
5. You should be asked for the "root" user password. Input the password you used at the very beginning when you were installing OpenSUSE.
6. On the left side of YaST, click once on "Network Devices". After clicking "Network Devices", click once on "Network Settings".
7. You'll notice several tabs at the top. We should start on the "Overview" tab. At the bottom of the screen, click "Edit". Click the button next to "Statically assigned IP Address", and input your IP address and Subnet Mask from step 2. Don't worry about the Hostname. Your screen should look similar to this image, only with your information inserted instead of mine. Press "Next" to get back to the first screen.

8. Click the "Routing" tab. In the "Default IPv4 Gateway" box, type the Gateway number you wrote down from step 3. Click OK and your network changes should be written to the system.
9. After writing network changes to system, you should be back in YaST. On the left side, click once on "Security and Users". On the right side, click once on "Firewall".
10. In the interest of simplicity and speed, we will just disable the Firewall completely. Change your settings to "Disable Firewall Automatic Start", and then press "Stop Firewall Now". After the Firewall has been stopped, press "Next". Press "Finish" to complete Firewall configuration.
We have now completed the setup for our Linux based file server. Not that you have to leave the system only as a file server, you can actually use it as a full fledged computer (though it's not recommended to do so with your Firewall disabled). The only thing left is to now be able to access it from our other computers.
Accessing Your Network Directory:
There are a few ways this can be done. I recommend the last option.
Option 1: Click Start. In Windows XP, click Run, in Vista and Windows 7, just use the Search bar in the Start button. Type:
Use the IP address you wrote down for your system, and instead of slyfox, type the directory you wish to access, either the "everyone" directory or the personal directory of the use (in my case, the "slyfox" directory). Enter your user account (slyfox) and your password and you should have access to your Linux share.
Option 2: Map the directory. This will put it in your "My Computer". Windows XP and Windows 7 do this differently. If you have Windows XP or Vista, you will have to Google how to do this, as I don't have XP or Vista handy. If you have Windows 7, open "My Computer". At the top of the screen, you should see "Map Network Drive". Click "Map Network Drive", choose the drive letter you wish to associate with your network directory and type:
Input your own IP address and your own network directory (either "everyone" or your personal user directory). Press Finish, enter your username and password, and you should have access. Do this again if you wish to access the other network directory (whichever one you didn't choose the first time).
Option 3: This is my personal favorite, and the easiest. Open Notepad. In Notepad, type the following:
Input your own IP Address, and instead of slyfox, enter the username you chose. Click "File - Save As". Name your file
From now on, whenever you click the batch script you just created, Windows will ask you for your user name and password, and once correctly entered, it will automatically map both directories to your "My Computer". You will now have easy access to your network directories. If you wish to map to a different letter (instead of Y and Z), put whichever letters you want, as long as they are not currently in use.
CONGRATULATIONS! You have successfully set up and installed a Linux server. You are able to share files easily across your network, and able to access your files from anywhere in the network. You can share files with other members of your family, or keep your files separate and away from the eyes of other family members. And the next time someone asks you, "How much do you know about computers", you can honestly say, "Well, I've installed and set up a Linux server to enable SAMBA sharing of files across the network, with each user having their own network directory". Chances are the person who asked will have no fucking clue what you just said.
Final Advice:
This section is not necessary, but can be helpful. Once you've setup your Linux file server, you don't have to have anything connected to it except for your power cable and a network cable. You can remove the monitor, keyboard and mouse if you so desire. In order to be able to do this, you will need to set up SSH on your Linux box, and download PuTTY to your main computer.
1. Open YaST (Menu button in the bottom left corner -> System -> Adminstration -> YaST)
2. Click once on "System" on the left side. On the right side, click once on "System Services (Runlevel)"
3. Scroll down until you see "sshd" under the "Service" heading. If under the "Enabled" heading it says "Yes", you're fine, if not click on the "sshd" line, and click "Enable" at the bottom of the screen. Then press OK on the window that pops up, and then press the green button OK. You should be finished with the Linux server.
4. Back on your main computer, download PuTTY. You want the version that says "putty.exe".
5. Once you've downloaded PuTTY, open it. Under "Host Name" type in the IP Address of your Linux server that you wrote down. You can press "Open" now, or you can type in a name under "Saved Sessions" and then press "Save" if you wish to save your settings. Either way, after you click Open, it will take you to a command prompt. Type in your user name, press enter, type in your password, press enter, and you are back at a command line terminal of your Linux file server (now you see why we changed a lot of those settings using Xterm).
6. You can do all of your commands from the terminal, or if you are the root user, you can open yast by typing "yast" at the command line.
Now that you can manage your Linux file server from your main computer, you no longer need a monitor, keyboard or mouse on that machine.
This ends this tutorial. If you have any questions, you can post them here and I'll TRY to answer them.
First, credit where credit is due. The majority of the heavy lifting was done by the following how-to on howtoforge.com.
http://www.howtoforge.com/opensuse-12.1-samba-standalone-server-with-tdbsam-backend
This tutorial is to help you re-purpose an old computer that is no longer being used. In this process, you will completely wipe the contents of your hard drive, so if you have any files you want to back up, do so before you begin. Aside from downloading and installing the operating system, this process is not too lengthy.
Please note: Your computer needs to have at least 512 MB of RAM. Any less, you might be able to do this, but I cannot guarantee you this tutorial will work. Your computer also needs at least a DVD-Rom (you might be able to get by with a CD-Rom, but I have not tested this). Also note, the bigger your hard drive, the more files you will be able to store. Finally, you need to have your file server connected to your router with a network cable.
Start-up Instructions:
1. Before you begin, please download the latest DVD version of OpenSUSE. Make sure you either get the 32 or 64 bit, depending upon what your computer is (if it's an older computer, it's likely 32 bit). If you know how to use BitTorrent, it will be a much faster download.
2. Download and install ImgBurn.
3. Run ImgBurn, insert a DVD into your DVD Writer, select "Write Image file to disc".
4. Under "Source", locate and select the OpenSUSE .iso file you downloaded. Burn the .iso to your blank DVD.
5. Once the disc is finished burning, you should now have a bootable DVD of a Linux operating system. Remove the disc, and take it to the computer you are setting up as a file server.
Building the Operating System:
The next thing we need to do is install OpenSUSE on the old computer.
1. Power on your machine, and immediately enter the system BIOS. Different machines do this in different ways, but it's usually by pressing the "Del" key or "F2" or "F12" immediately after powering on the computer. Each computer is different and each machine will usually tell you how to enter the system setup or BIOS.
2. Once in the BIOS, search for something which will let you change your Boot Order, or Boot Priority. You want to change your BIOS so your DVD-Rom is the first device to boot (before your hard drive).
3. Once you've changed your BIOS boot-up order, insert your OpenSUSE DVD, save your BIOS changes and restart the computer.
4. The OpenSUSE disc should boot now. When given the prompt, you want to select "Installation". Wait as the installer software loads.
5. Once the installer loads, work your way through the prompts (keeping the defaults). Accept the License Agreement, choose "New Installation", select your Time Zone.
6. Once you get to the screen that says "Desktop Selection", select "Other". Check the "LXDE Desktop" and click Next.
7. On the "Suggested Partitioning" screen, select "Create Partition Setup". On the next screen, select option 1 (which should be your hard drive, do NOT select Custom Partitioning) and hit Next. When given the option, you want to "Use entire disk". This will wipe your existing Windows installation. Once you've finished with partitioning, select Next.
8. Now you create the system's user. Put anything you want in these fields, but under "Username" I will be using the name "user". If you choose something different, you will have to substitute whatever you put in the Username field whenever I say "user". For simplicity's sake, I recommend you choose "user" as well. Remember your password, and keep all the default options (for the sake of simplicity). If you get a warning from YaST2 about your password, just ignore it, it's not important for this tutorial. After you have filled in the fields, select Next.
9. Now we come to the "Installation Settings" screen. We're going to make one change. Click on "Software".
10. On the left side, search for the "Server Functions" heading. Under "Server Functions", click in the box next to "File Server". There should now be a checkmark next to it. Click the "OK" button.
11. Click Install. Your Linux operating system should now be installing.
Configuring the File Server Software (SAMBA):
After you have installed OpenSUSE, it will automatically restart and then boot into the operating system. You should be at a desktop which looks similar to a Windows desktop. Now, it's possible to proceed in a couple of different ways, but we will use the command line terminal for reasons I will mention later.
1. We need to open XTerm. We can do this in one of two ways. The first way is to click the green lizard looking button in the bottom left hand corner (like a Windows start menu), hover your mouse over "System Tools" and select "XTerm". The other way is to press Alt and F2 at the same time on your keyboard, and in the "Run" box which pops up, type "xterm" and press OK.
2. We should now have a terminal window open. From here we are going to be issuing commands. Please note commands need to be typed exactly as posted here, as Linux is case sensitive, unlike Windows. I will try to put everything you should type into the terminal in code, like this:
Code:
This is an example3. First, we need to access the "root" account. The "root" account is like the "Administrator" account in Windows, in that it is the all powerful ruler of the system. The only time you should work as root is when you know exactly what you're doing. Type:
Code:
suAnd then input the password you used when you installed the operating system.
4. Next we need to do some editing to the SAMBA file server. Type:
Code:
vi /etc/samba/smb.conf5. The configuration for SAMBA should now open in the terminal. We are using the program "vi" to edit the configuration file. Vi can be a complicated program for beginners, so please follow the directions closely.
6. Move your cursor to one line below the [global] header, in front of the "workgroup = WORKGROUP". Now you need to press the "i" button on your keyboard, which will put vi into INSERT mode. You must be in INSERT mode to type in the configuration file.
7. After you are in INSERT mode (as noted at the bottom of the file), create a blank line by pressing the "Enter" button. On that blank line, type (there will be a space in between each word and symbol):
Code:
security = user8. After you have typed that in, make sure you have a line in the [global] section that says, "passdb backend = tdbsam". If not, add that as well (should not be necessary).
9. Press the "Esc" key on your keyboard to exit INSERT mode and enter the COMMAND mode of vi. After pressing escape, type (it doesn't matter where your cursor is):
Code:
:wq10. Now we need to get the SAMBA service started. Type:
Code:
systemctl enable smb.service
Code:
systemctl start smb.serviceAdding SAMBA Shares:
In order to properly be able to access files, we have to set up folders (called directories in Linux) for people to be able to access. In this section, we will create the directories to be shared for storing our files and edit the configuration of SAMBA to accept users accessing these files.
1. You should still be the "root" user, but if you're not, open a terminal and access the root user account by typing "su".
2. Type the following commands, pressing "Enter" after each line. These commands are case sensitive, so capital letters MUST be typed in capitals and lower cased letters MUST be typed in lower case.
Code:
mkdir -p /home/shares/everyone
chown -R root:users /home/shares/everyone/
chmod -R ug+rwx,o+rx-w /home/shares/everyone/
Without getting into the specifics, what we did was create a directory called "everyone" and made it so every user can save their files to it.
3. Now we need to edit the SAMBA configuration file again. Type:
Code:
vi /etc/samba/smb.conf4. Scroll to the bottom of the file, press "i" to enter INSERT mode, move the cursor to a blank line at the very end of the file (you might have to press Enter after the last character) and type the following. Again, make sure it's typed exactly, and there is a space between words and equal sign. You can use the "Tab" key on your keyboard to indent. Type:
Code:
[allusers]
   comment = All Users
   path = /home/shares/everyone
   valid users = @users
   force group = users
   create mask = 0660
   directory mask = 0771
   writable = yes
[homes]
   comment = Home Directories
   browseable = no
   valid users = %S
   writable = yes
   create mask = 0700
   directory mask = 0700
5. Before we leave the configuration file, we have one last thing to do. If you scroll up, you will see another header [homes], similar to the one we just created. We do not want to delete it, we just want to make sure it isn't used. We do this by placing a # sign in front of each line. So it should look like this (image includes the configuration settings we added).
6. Exit INSERT mode and get back into COMMAND mode by pressing the "Esc" button. Then type ":wq" to save and exit the file. Then type:
Code:
systemctl restart smb.serviceAdding Users:
So far, what we have done is set up the file server services, created a directory for everyone to access and configured SAMBA so each user can have their own personal storage space, in addition to the directory everyone is sharing. Now it's time to add users to the system. I'll be creating a new user called "slyfox" (notice it's all in lower case) but you can name your users anything you want (but lower case names is strongly encouraged).
1. Type:
Code:
useradd slyfox -m -G users2. Type:
Code:
passwd slyfox3. Type:
Code:
smbpasswd -a slyfox4. Repeat steps 1-3 as many times as necessary.
Important Miscellaneous Steps:
We have now setup our SAMBA file server and created the users who will be accessing it. The last thing we need to do is figure out HOW they will access it. We will do this by setting the IP address and disabling our firewall. We will do this in OpenSUSE's very powerful administrative program called YaST. You CAN access YaST through the command line, but we'll do it the much more visually pleasing way. However, being able to access YaST through the command line will be beneficial later.
1. Open Xterm (if it's not already open). You do not have to be the "root" account for these steps.
2. Type:
Code:
/sbin/ifconfig3. Type:
Code:
route -n4. Now that we have our network information, let's get to YaST. Click the green lizard looking button in the bottom left hand corner (like a Windows start menu), hover your mouse over "System", then hover over "Administration" and select "YaST".
5. You should be asked for the "root" user password. Input the password you used at the very beginning when you were installing OpenSUSE.
6. On the left side of YaST, click once on "Network Devices". After clicking "Network Devices", click once on "Network Settings".
7. You'll notice several tabs at the top. We should start on the "Overview" tab. At the bottom of the screen, click "Edit". Click the button next to "Statically assigned IP Address", and input your IP address and Subnet Mask from step 2. Don't worry about the Hostname. Your screen should look similar to this image, only with your information inserted instead of mine. Press "Next" to get back to the first screen.
8. Click the "Routing" tab. In the "Default IPv4 Gateway" box, type the Gateway number you wrote down from step 3. Click OK and your network changes should be written to the system.
9. After writing network changes to system, you should be back in YaST. On the left side, click once on "Security and Users". On the right side, click once on "Firewall".
10. In the interest of simplicity and speed, we will just disable the Firewall completely. Change your settings to "Disable Firewall Automatic Start", and then press "Stop Firewall Now". After the Firewall has been stopped, press "Next". Press "Finish" to complete Firewall configuration.
We have now completed the setup for our Linux based file server. Not that you have to leave the system only as a file server, you can actually use it as a full fledged computer (though it's not recommended to do so with your Firewall disabled). The only thing left is to now be able to access it from our other computers.
Accessing Your Network Directory:
There are a few ways this can be done. I recommend the last option.
Option 1: Click Start. In Windows XP, click Run, in Vista and Windows 7, just use the Search bar in the Start button. Type:
Code:
\\192.168.1.120\[I]slyfox[/I]Use the IP address you wrote down for your system, and instead of slyfox, type the directory you wish to access, either the "everyone" directory or the personal directory of the use (in my case, the "slyfox" directory). Enter your user account (slyfox) and your password and you should have access to your Linux share.
Option 2: Map the directory. This will put it in your "My Computer". Windows XP and Windows 7 do this differently. If you have Windows XP or Vista, you will have to Google how to do this, as I don't have XP or Vista handy. If you have Windows 7, open "My Computer". At the top of the screen, you should see "Map Network Drive". Click "Map Network Drive", choose the drive letter you wish to associate with your network directory and type:
Code:
\\192.168.1.120\[I]slyfox[/I]Input your own IP address and your own network directory (either "everyone" or your personal user directory). Press Finish, enter your username and password, and you should have access. Do this again if you wish to access the other network directory (whichever one you didn't choose the first time).
Option 3: This is my personal favorite, and the easiest. Open Notepad. In Notepad, type the following:
Code:
net use Y: \\192.168.1.120\everyone
net use Z: \\192.168.1.120\slyfox
Input your own IP Address, and instead of slyfox, enter the username you chose. Click "File - Save As". Name your file
Code:
server.batCONGRATULATIONS! You have successfully set up and installed a Linux server. You are able to share files easily across your network, and able to access your files from anywhere in the network. You can share files with other members of your family, or keep your files separate and away from the eyes of other family members. And the next time someone asks you, "How much do you know about computers", you can honestly say, "Well, I've installed and set up a Linux server to enable SAMBA sharing of files across the network, with each user having their own network directory". Chances are the person who asked will have no fucking clue what you just said.
Final Advice:
This section is not necessary, but can be helpful. Once you've setup your Linux file server, you don't have to have anything connected to it except for your power cable and a network cable. You can remove the monitor, keyboard and mouse if you so desire. In order to be able to do this, you will need to set up SSH on your Linux box, and download PuTTY to your main computer.
1. Open YaST (Menu button in the bottom left corner -> System -> Adminstration -> YaST)
2. Click once on "System" on the left side. On the right side, click once on "System Services (Runlevel)"
3. Scroll down until you see "sshd" under the "Service" heading. If under the "Enabled" heading it says "Yes", you're fine, if not click on the "sshd" line, and click "Enable" at the bottom of the screen. Then press OK on the window that pops up, and then press the green button OK. You should be finished with the Linux server.
4. Back on your main computer, download PuTTY. You want the version that says "putty.exe".
5. Once you've downloaded PuTTY, open it. Under "Host Name" type in the IP Address of your Linux server that you wrote down. You can press "Open" now, or you can type in a name under "Saved Sessions" and then press "Save" if you wish to save your settings. Either way, after you click Open, it will take you to a command prompt. Type in your user name, press enter, type in your password, press enter, and you are back at a command line terminal of your Linux file server (now you see why we changed a lot of those settings using Xterm).
6. You can do all of your commands from the terminal, or if you are the root user, you can open yast by typing "yast" at the command line.
Now that you can manage your Linux file server from your main computer, you no longer need a monitor, keyboard or mouse on that machine.
This ends this tutorial. If you have any questions, you can post them here and I'll TRY to answer them.