Creations

The Doctor

Great and Devious
Staff member
Super Moderator
Welcome, one and all, to my new Creations thread!! Just a quick note: If you want to request something from me, saunter on over to the Requests forum and post one there. I'll post the finished product in here when it's done.

hraaaa.png


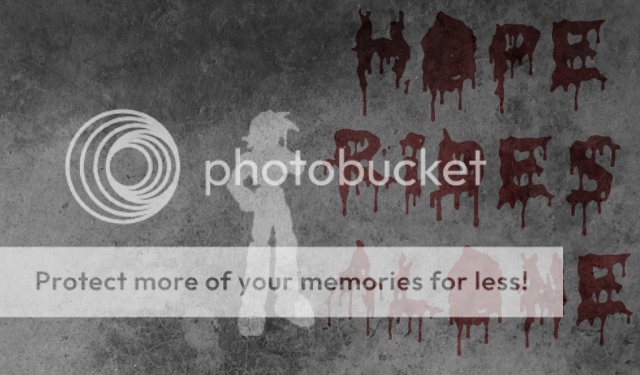
This is my current wallpaper, shrunk down a little. The brushes were concrete texture brushes I got from Brusheezy, and the font is Homicide Effect.
It's based on my favorite band, The Protomen. They do epic rock operas and in Act I, Hope Rides Alone is a major plot point, as well as the name of the first song on the album. The white silhouette of Mega Man is some official art of his Legends incarnation, as I envision that version to be the one in The Protomen's songs.
 
rorschach.png


I made this for Dave. He wanted a grungy sig with a splash of color. I LOVE how it turned out. I used a layer mask to get the color on Rorschach by duplicating the color pic, desaturating and messing with the levels of the original, and adding a mask to the top (color) pic. Then I filled the mask with black and used a white spatter brush to allow some parts of the color pic to show.
 
fodposter-actuallycompletelyfinalfo.png


In graphics class, we had to make a movie poster. I based mine off of the Protomen's second album, The Father of Death. I think it's easily the best thing I've ever done. The actor is Victor Rivers, and he suits my vision of middle-aged Wily perfectly. The screens were HDTVs I found on Google and warped. I added some static, as well. The city is a random cityscape, darkened and edited. The "Keep Quiet." graffiti is a reference to their song, Keep Quiet, and I was using it to show a sort of resistance movement in The City. I originally wanted all the text to be flat and white, like how the names are, but after a lot of convincing by my teacher I decided the coloring the title made it nicer looking without taking away too much from my original effect. The credits at the bottom are the names of the band members.
 
austin.png


Just made this, as a request. I was feeling particularly inspired. I found this great picture of Austin from PSD Dreams, and I masked it slightly to make it blend more into the background. I actually cut the words from the T-Shirt, which I found online by Googling "arrive raise hell leave". I then added a 1 pixel stroke to the text, duplicated the layer, dragged it down, inverted the colors, and dragged it to create a nifty 3D effect. I downloaded some awesome new grunge brushes the other day so I thought I'd test them out. Love how it all worked out.
 
deeb.png


I found this awesome site for tutorials on the internet, so I thought I'd try one out. I made the background out of the picture of DB and some filters, and I really like how it turned out! To find the tutorial, I Googled "Sig Tutorials". It's a great place.
The font is Arial.
 
cobrastarship.png


Made this for tdigs. He likes Cobra Starship, I like Cobra Starship, so it worked out. I wasn't really sure where to go with the sig, so I did some random cloud brushes in the background and then did a Gaussian blur on them. I did colorful cloud brushes on another layer and set it to overlay, and then I did a gradient map over everything to give it a cool effect. Found the pic of Cobra Starship and their logo on Google.
 
gendo.png


Now, I've never seen Neon Genesis Evangelion. Apparently it's completely messed up and weird. But I've seen Gendo Ikari. I don't know much about his character (Other than "major douche", "God complex"), but I love his character design. I felt like testing some smudging and sig-making techniques out, so I made this. I had four copies of the render I believe and I used a chalk brush to smudge. The font is Visitor.
I like how it turned out.
 
alucard.png


Another anime sig, this time from one called Hellsing. It's another anime I haven't seen, but really want to. I love the character designs and I've seen some cool fight scenes from it. It also looks totally badass.
I didn't feel like doing some homework today, so I goofed off on Photoshop instead. I tested some different smudging styles and blended layers in random ways. I did a lot of experimentation with this one. Anyone who wants to use it is free to. I may use it in a week or so or whenever I'm tired of my current sig (which probably won't be for a while as I love it).
 
One more experimental anime sig for the road:

wolfwood-1.png


This one took a longer time than I expected to do. I was just experimenting, using various brushes to smudge various copies of the Render. I moved three copies of the original Wolfwood render around and used the smudge tool to smudge it. I then made another copy of Wolfwood and smudged that with an X-shaped brush I made. I then found this cool render of a beam of light which I then colored blue to fit the sig and warped it to fit the perspective. I added a Photo filter to make everything have a blue tinge to it and blurred and lightened in random ways. I then added a light source, some shadows, some text, and a border.

Nicholas D. Wolfwood is my favorite character from the anime Trigun, a space opera Western. In other words, its genre is Awesome. It's high on my "recommended" list.
 
kristoph.png


Not an anime sig, a videogame sig! Kristoph Gavin is my favorite character in the Ace Attorney videogame series. He's a lot more sinister than he originally appears (Understatement of the century) which is why I included those background pictures. The line in the sig is a line from "Angel of Music" from the musical Phantom of the Opera. The original verse is:

"Flattering Child, you shall know me
See why in shadow I hide.
Look at your face in the mirror,
I am there, inside.
"

That verse gives me chills every time. Fits Kristoph so perfectly.

I made the sig while bored at school, smudging with a chalk brush and setting layers to Color Dodge. I added lighting and a gradient map set to Pin Light in order to fix the colors up a bit.
 
dbsmudge.png


Well, you all know my love of Bryan Danielson. I wanted to test out smudging even more, and try and make a sig that really blended together. I did a lot of render smudging and color dodging and lots of Adjustment Layers. Did some lighting adjusting using a layer set to overlay and some burning and dodging, and I did a lot of abstract brushing.

You're gonna get your fucking head kicked in!
 
Not bad Doc, the only critique I would have is that the left side of his face is almost to blacked out, it's hard to make out the 'tattoo' under his eye and after that his face completely disappears to an extent, where as on the right side of his face it's bright enough that it looks like his cheek is not there. So other than tweaking those things a bit, it's awesome.
 
abpark.png


Made this today. I experimented a lot, seeing if I could use all sorts of techniques on a single photo, the cover of "Airborn" by Kenneth Oppel, which features an awesome airship. I also wanted to combine it with a band I'm digging at the moment who have the gimmick of being Airship Pirates. I smudged the cover, added scanlines, smudged even more with different brushes, added a desaturated paper texture...to say all I did would be impossible. I basically threw everything I had on it and more.

I will talk about the tearing away effect. I made that using layer masks. I Applied the image on a new layer and put clockwork underneath. I added a layer mask, then a layer style of a drop shadow and white stroke. I used a chalk brush to paint on the mask, creating the torn paper effect.

I think I'll use this one as my sig.
 
There is a reason that you are the best sig-maker around these parts.

One such reason is that I am constantly looking at your request thread and here to see what you have come up with. You are an inspiration when sig-making and I wanted to get that out of the way first. This new sig is absolutely brilliant. I have no idea how you managed to get the background like that and when you pull something like this out of the bag, it makes us all step back and notice. background is fantastic and the inspiration to put the machinery behind it is brilliant. Personally, I love this sig and this is what I aim to produce when I make any.

I just have one reservation and it is not even that big of a deal. For me, I would have lowered the amount of stroke you have around the tears. I mean, it looks good and everything but it is just a matter of personal opinion.

Great work, Doc.
 
And now for something completely different.

faust.jpg

I was feeling very inspired by Abney Park's newest album. The text is from their song "Building Steam". I dressed up in a top hat and mirrored sunglasses, took a picture, and went to work. To detail everything I did would take forever, as I worked on this for five hours or so.

The globe I made by starting with a document 1000pxX1000px. I did a lens flair, used polar coordinates (Don't remember which option), rotated the image 180 degrees, and then did Polar Coordinates with the other option selected to get a glass-looking sphere. To add in all the parts inside I used the Overlay blending mode.

I absolutely love how this turned out. Exactly like I had hoped.
 
clockworkgirl.png


Made this out of boredom. It was an idea I had. I found a random black and white picture on Google and made a layer underneath filled with black. I used a mask to cut out a section of the back without damaging the image, then added a Bevel And Emboss and Drop Shadow. I put some gears underneath and made them have some texture using Bevel And Emboss. After that I did some touching up, made the photograph border, put an orange-to-blue gradient map over the top of everything, changed the opacity of that to 25%, used a mask on it to give the border some texture, and voila.
 
skybox.png


This was fun. I decided to use my Photoshop skills to make a semi-realistic vision of what the videogame Killer Instinct would look like in real life. It's a fighting game, and one of the best levels is called the Sky Box. you can get knocked off to end the fight at any time. It's fun.

The two characters and Cinder and Glacius. I used silhouettes of fighting men and painted over them, adding ice images and fire images where appropriate. Lots of perspective warping was done to make the sky box. It was just a fun little project.
 
need.png


I made this yesterday, and I really like how it turned out, considering I only had a vague idea of what I wanted. I've been listening to Neuroticfish's song "Need" a lot lately (that's where the lyrics come from) and I wanted to make a sig that captures the feeling I get when I listen to it.

First off, I wanted something dark, horror-themed. The song makes me think of obsession, and insanity. Or maybe a "man behind the man", a master manipulator. I originally started out with a random picture of a scared-looking girl I found on Google, and I edited it to make it darker, and I did my normal detail accentuation. I Twirled a C4D render for the background and duplicated+smudged it and set that one to overlay. I adjusted lighting and minor details, added a black and white adjustment layer and a gradient map of some sort. Probably Green to Red or Red to Black, I don't recall. I put the scariest picture of Kristoph Gavin ever behind her and darkened him. The characters I used aren't important, more the overall feeling.

I was working on this for hours, so I don't remember what I did, like, at all. I just know I love how it turned out.
 
danielson-1.png


Yeah I made this today using fairly standard techniques. I started with a black background, made a new layer and did some scratch brushes over it to give it texture, and did some grunge brushing here and there to give it more. I did the normal smudging techniques with multiple renders set to Color Dodge, but that's where things get a little different.

For the main render, I duplicated it, destaurated the top, and set the blending to Overlay. This is a technique I love to use that brings out the shadows and really gives the render a cool look. It can fill your render with NICE contrast. I then merged those two layers, made a new one, and Applied the image. I adjusted the lighting using the Overlay mode and soft black and white brushes, then made a black-and-white adjustment layer that I set to Soft Light to adjust the colors and lighting some more. I then Applied the image again, and added a C4D fractal set to Linear Dodge. I duplicated it and moved it, then deleted all the parts overlapping the Danielson render. I Applied the image one last time, duplicated it, did a 3.0 Gaussian Blur on the top one and set it to Soft Light, which is a technique I like to use as it gets rid of rough edges and makes everything flow smoothly. I then added the text (Visitor -BRK-, size 10, no anti-aliasing, white, blending mode set to Overlay, 1px black stroke), added a border, and voila.

I love how it turned out, especially since I'm not very good at using C4Ds to any great effect. Good experiment and a good sig.
 
barrerbian.png


Made this for Ferbian. It was a fairly simple sig, one that I loved the end result of. I started with a black background and this render of Barrett. I sampled a yellow color from Barrett's armband, and brushed using Octane's grunge/abstract brushes. I then duplicated the Barrett render, desaturated the duplicate, and set its blending mode to Linear Light in order to bring out the contrast. I then Applied the image to a new layer and used a black-and-white adjustment layer with the Yellow slider turned up. I set the adjustment layer to Hard Light, and sharpened the original Applied image. The text was Lucida Sans. A 1px black border finished it off.
 
mikami.png


I love how this turned out!

Teru Mikami is an awesome character from the manga/anime DeathNote. FunnyKay requested a sig of him, so this is what I made.

I started with a cool image (not render; the BG was there too) of Mikami. I separated him from the background, desaturated him, then made a new layer over everything that I brushed with black in order to bring focus and add a spotlight effect. I then blurred bits of the background and lightened some just behind Mikami. The text was just Lucida Sans set to Overlay, with a font called 28 Days Later used for the DELETE's nearest him. I tried to show that he's unhinged. finally, I put the color cut-out of Mikami over the desaturated one and changed it to soft light and lowered the opacity, just to add a little bit of color and definition.
 
hellsiing.png


Another Hellsing sig, because that show is amazing. The style is just awesome, and it lends itself to some cool sigs.

I wasn't really sure what I wanted to do with this at first. I took that main render of Alucard and did random smudging, trying out how the smudges looked on top of different backgrounds, like radial gradients. I think I ended up with an orange-to-red-to-transparent gradient as the background. I smudged it in various ways until I got this rough and grungy feel that I liked. I added a gradient map and blended in the background render. I also added a lighting effect to the main render's eye, because it looked cool.

Nothing too special was really done with this sig. Just kinda playing around, but I love how it turned out.
 
spike.png


Yes, yes, another anime sig. What can I say; anime renders are a ton of fun to work with. This time it's Spike Spiegel, from the fantastic space western anime Cowboy Bebop. I actually only just started watching it, and man oh man is it awesome.

I wanted to imitate the style of the show when I made this. I had various Spike renders, and I started with a black background. I made some colored squares and made them clipping masks using the various renders. I set the blending modes of the renders to different things, probably Overlay. I made an all black layer above everything and changed the Fill to 25%. I did a pattern overlay on that layer, and did scanlines. On the main Spike render I did my duplicate-desaturate-Overlay trick, and combined the two. On the main render I did a huge outer glow set to Color Dodge. Then I Applied the image, blurred it and set it to Soft Light. I think I adjusted the Opacity a bit too. The "Bang" is something he says in the show, and the font is iNKED GOD. A five pixel black border finished it off.

If it wasn't for RAW Talent, I'd be sporting this one right now.
 
natalya-1.png


Natalya!

Well I was in the mood to try and learn how to handle brushes better than I do. I found a tutorial on the internet, and set to work. I smudged the image of Natalya, doing exactly what the tutorial told me to do, but nothing was working. Eventually I got fed up so I started throwing random new brushes at the sig in the hope I could save it, and this is the result. I did some lighting adjustments, some glowing layer styles, and some Scriptina to finish it off.
 
Alright, I'm quite impressed. I've seen your name around the forums several times, Doc, mostly in regards to your sigs, but I figured you were just someone with a bit of a knack for photoshop who made sigs as a hobby.

Yeah, I don't really think knack is the right word for your skill with Photoshop. Enjoyed looking at these, even if they aren't all wrestling related. Granted, the anime ones don't do as much for me, but then, I've never been big on anime. Anyway, nice job on the art, man. Makes me wish I actually had some sort of discernible skill.
 

Users who are viewing this thread

Members online

No members online now.

Forum statistics

Threads
174,826
Messages
3,300,732
Members
21,726
Latest member
chrisxenforo
Back
Top